Build guide
For developers only
Cloning the repository
The code repository can be found here.
Choose or create a directory for the repository to get cloned into, such as your Desktop. This is the directory we'll be working out of, so pick somewhere convenient. Be aware that spaces in the path will not work! For example C:\dev\git_projects\TiltedEvolution is fine but C:\dev\git projects\TiltedEvolution will NOT work.
Fork the repository through Github. Using the command line, run the following command in the directory from the previous step: git clone --recursive https://github.com/[YourGithubName]/TiltedEvolution.git . Replace [YourGithubName] with your Github name.
Once the command has finished executing, you should have a copy of this repository named TiltedEvolution inside your project directory.
Setting up the environment
Requirements
You will need Visual Studio 2022 (the community edition is freely available for download) and xmake to build the project, as well as Node.js and PNPM for building the UI.
Installing Visual Studio 2022
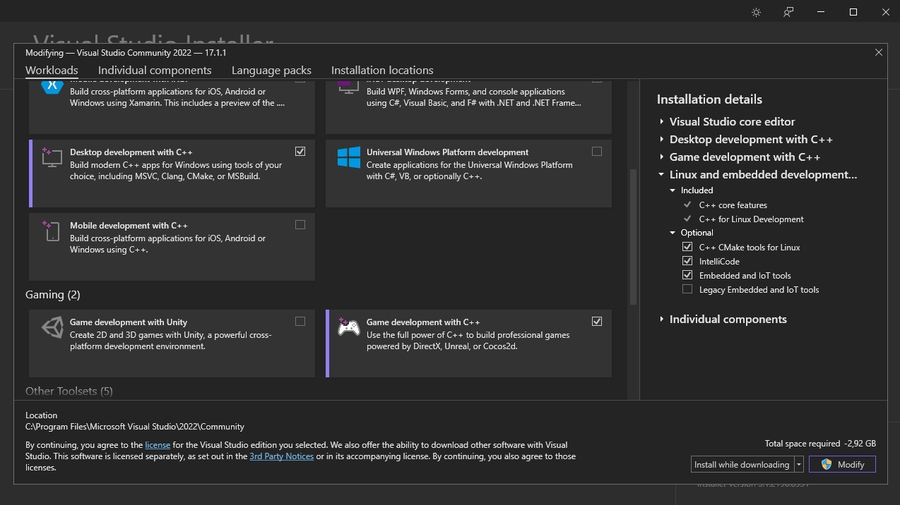
Download Visual Studio 2022 from the official webpage (the community edition is free). Follow the installation steps and when you reach the following screen, select the options "Desktop development with C++" and "Game development with C++".

Generating the project files
Run xmake project -k vsxmake to generate TiltedEvolution.sln , the Visual Studio solution which we'll be using. This can now be found in the vsxmake20** folder. You can choose the build mode either in Visual Studio directly, or through the command line, xmake config -m releasedbg .
You MUST do this step every time you merge changes from the main repository to avoid conflicts.
Do NOT use the debug build for the client as it will ONLY work for the server. If you want to debug the client, use releasedbg.
Building
The mod can either be compiled through Visual Studio, or through the command line, xmake -y . If all goes well, everything should now be compiled. Should you encounter any errors, feel free to ask for help in the Skyrim Together Discord #coding channel.
Running and debugging
Building is the first step; once the project compiled successfully you will need to generate an install by running xmake install -o distrib, which will create a directory called distrib in the root path that contains all of the files needed to run. Copy the files in distrib/bin over to build/windows/x64/releasedbg . This step should only be performed once, when building the project for the first time.
In Visual Studio, set FalloutImmversiveLauncher or SkyrimImmversiveLauncher as the startup project and ensure you are in the dev branch. Hit Local Windows Debugger to start debugging. From build/windows/x64/releasedbg , you can launch the server executable and a second client if you wish.
Building the Together UI
Until you've built and installed the Together UI, you will not have it in game (this does not include the debug UI). Open a shell inside Code/skyrim_ui and execute pnpm install. This will install the required packages.
Next, execute pnpm deploy:develop to build the development version. Alternatively, execute pnpm deploy:production to build the production version. Copy the folder Code/skyrim_ui/dist/UI over to build/windows/x64/releasedbg . Although not necessary, we recommend creating a symbolic link to the folder during development instead of duplicating to avoid having to copy over the folder after each build.
Verifying
If everything worked as intended, a Tilted Reverse Console will pop up. Once loaded into a save, run the corresponding server executable (or script, if you created one). Press F3 to display the Dear ImGui debug UI on top of your game. You should now be able to connect in-game by using the UI in the top left corner; pressing RCTRL or F2 should free your mouse so that you're able to interact with the UI. Note that you must have the Address Library mod manually installed to launch an instance of the game.
Working in this repository
From now on, whenever you want to make a change in the repository, you will first need to branch off the master branch. Using a CLI in the TiltedEvolution directory, first check if the master branch is fully up to date:
Now you can create a new branch. Please use the feature- prefix so that it's clear that your branch is a temporary, in-progress development branch. Creating your branch can be done using one of two methods:
CLI
Simply enter git checkout -b feature-somenamehere to have a branch created for you.
GitHub for Desktop
In the application, go to Branch -> New branch.... Give this an appropriate name (don't forget the prefix) and ensure that the branch is based on the master branch.
Understanding the code
Project structure
When it comes to the actual code (located in TiltedEvolution\Code), the two primary folders of interest are client and server.
Client is the core of the mod and can be broken down into Games, Services, and Systems.
Gamescontains all of the code that is Skyrim and Fallout 4 related, it mostly contains class structures and hooks to different parts of the engineServicescontains the different services that handle the actual sync, display, and gameplaySystemscontains specific tasks like interpolation and consuming animations
Server is the, well, server! It doesn't really contain much at the moment, it's a translation layer more than anything for the time being.
Starting points
When getting started, a good place to begin is looking at the DebugService in client\Services as it demonstrates how to get a service to listen to update events and how to spawn a copy of yourself. It also displays a bunch of gameplay elements for which we have written debuggers.
Afterword
And that's all! With that, you're on your way to making great contributions to the repository. As mentioned previously, if you have any questions or encounter any hurdles, feel free to use the #coding channel in the Skyrim Together Discord!
Last updated
Was this helpful?